内容来源:
- 沉默王二 GitHub 上开源的知识库《Java 进阶之路》
- JavaGuide
- CLH锁 - Quner技术沙龙
- 操作系统 - 西电出版
This is the multi-page printable view of this section. Click here to print.
内容来源:
AbstractQueuedSynchronizer的简称,即抽象的队列同步器AQS是AbstractQueuedSynchronizer的简称,即抽象的队列同步器
AQSAQS 是一个用来构建锁和同步器的框架,使用 AQS 能简单且高效地构造出应用广泛的同步器 简单的说, 存储并管理线程同步的模板
具体的同步器(如 ReentrantLock、CountDownLatch、Semaphore, FutureTask等)是通过继承 AQS 并实现一些抽象方法来实现资源的具体获取和释放行为的。
AQS的作用是什么?了解 自旋锁与CLH锁
AQS 是一个 抽象类,它为具体的同步器提供了一个通用的执行框架。
它定义了如何获取和释放共享资源的基本流程,但并没有实现具体的逻辑。
AQS 提供了同步器所需要的 框架和基础设施,比如:
其中AQS 的核心数据结构是基于CLH 锁改进的, 详情下述
既然是控制线程, 那么数据结构应对并发相应的优化
AQS的核心数据结构是基于 CLH队列锁改进的
 CLH队列锁有如下缺点
AQS 内部使用了一个volatile关键字 的变量 state 来作为线程的状态标识。
volatile int waitStatus;
该变量有如下状态, AQS提供原子读写 ![[content/en/java/Basic/Concurrent/Pasted image 20250203210552.png]]

(T1 释放锁后主动唤醒 T2,使 T2 检测到锁已释放,获取锁成功。)
在释放锁时,如果当前节点的后驱节点不可用时,将从利用队尾指针 Tail 从尾部遍历到直到找到当前节点正确的后驱节点。 这是因为双端队列的插入没有相应的原子操作, 因此后驱节点的设置并非作为原子性插入操作的一部分,而仅是在节点被插入后简单地赋值
AQS还实现了共享读 资源有两种共享模式,或者说两种同步方式:
独占模式(Exclusive):资源是独占的,一次只能有一个线程获取。如 ReentrantLock重入锁 _index
共享模式(Share):同时可以被多个线程获取,具体的资源个数可以通过参数指定。如 Semaphore/CountDownLatch
这两种模式是在内部类 Node 中实现的
Node源码
可以看到 node中的状态信息都是常量, 无法修改的
static final class Node {
    // 标记一个结点(对应的线程)在共享模式下等待
    static final Node SHARED = new Node();
    // 标记一个结点(对应的线程)在独占模式下等待
    static final Node EXCLUSIVE = null;

    // waitStatus的值,表示该结点(对应的线程)已被取消
    static final int CANCELLED = 1;
    // waitStatus的值,表示后继结点(对应的线程)需要被唤醒
    static final int SIGNAL = -1;
    // waitStatus的值,表示该结点(对应的线程)在等待某一条件
    static final int CONDITION = -2;
    /*waitStatus的值,表示有资源可用,新head结点需要继续唤醒后继结点(共享模式下,多线程并发释放资源,而head唤醒其后继结点后,需要把多出来的资源留给后面的结点;设置新的head结点时,会继续唤醒其后继结点)*/
    static final int PROPAGATE = -3;

    // 等待状态,取值范围,-3,-2,-1,0,1
    volatile int waitStatus;
    volatile Node prev; // 前驱结点
    volatile Node next; // 后继结点
    volatile Thread thread; // 结点对应的线程
    Node nextWaiter; // 等待队列里下一个等待条件的结点


    // 判断共享模式的方法
    final boolean isShared() {
        return nextWaiter == SHARED;
    }

    Node(Thread thread, Node mode) {     // Used by addWaiter
        this.nextWaiter = mode;
        this.thread = thread;
    }

    // 其它方法忽略,可以参考具体的源码
}

// AQS里面的addWaiter私有方法
private Node addWaiter(Node mode) {
    // 使用了Node的这个构造函数
    Node node = new Node(Thread.currentThread(), mode);
    // 其它代码省略
}
AQS 的设计是基于模板方法的,它有一些方法必须要子类实现,它们主要有:
isHeldExclusively():该线程是否正在独占资源。只有用到 condition 才需要去实现它。tryAcquire(int):独占方式。尝试获取资源,成功则返回 true,失败则返回 false。tryRelease(int):独占方式。尝试释放资源,成功则返回 true,失败则返回 false。tryAcquireShared(int):共享方式。尝试获取资源。负数表示失败;0 表示成功,但没有剩余可用资源;正数表示成功,且有剩余资源。tryReleaseShared(int):共享方式。尝试释放资源,如果释放后允许唤醒后续等待结点返回 true,否则返回 false。比较特殊的是, 这里的抽象方法并没有加
abstract关键字 这是因为并非AQS的所有抽象方法都需要子类实现, 所以子类只重写需要的方法就行
子类不是重点, 我们来看模板类, 也就是AQS的逻辑
获取资源的入口是 acquire(int arg)方法。arg 是要获取的资源个数,在独占模式下始终为 1。我们先来看看这个方法的逻辑:
public final void accquire(int arg) {
    // tryAcquire 再次尝试获取锁资源,如果尝试成功,返回true,尝试失败返回false
    if (!tryAcquire(arg) &&
        // 走到这,代表获取锁资源失败,需要将当前线程封装成一个Node,追加到AQS的队列中
        acquireQueued(addWaiter(Node.EXCLUSIVE), arg))
        // 线程中断
        selfInterrupt();
}
首先调用 tryAcquire 尝试去获取资源。如果获取资源失败,就通过 addWaiter(Node.EXCLUSIVE) 方法把这个线程插入到等待队列中。其中传入的参数代表要插入的 Node 是独占式的。
private Node addWaiter(Node mode) {
 //创建 Node 类,并且设置 thread 为当前线程,设置为排它锁
 Node node = new Node(Thread.currentThread(), mode);
 // 获取 AQS 中队列的尾部节点
 Node pred = tail;
 // 如果 tail == null,说明是空队列,
 // 不为 null,说明现在队列中有数据,
 if (pred != null) {
  // 将当前节点的 prev 指向刚才的尾部节点,那么当前节点应该设置为尾部节点
  node.prev = pred;
  // CAS 将 tail 节点设置为当前节点
  if (compareAndSetTail(pred, node)) {
   // 将之前尾节点的 next 设置为当前节点
   pred.next = node;
   // 返回当前节点
   return node;
  }
 }
 enq(node);
 return node;
}

// 自旋CAS插入等待队列
private Node enq(final Node node) {
    for (;;) {
        Node t = tail;
        if (t == null) { // Must initialize
            if (compareAndSetHead(new Node()))
                tail = head;
        } else {
            node.prev = t;
            if (compareAndSetTail(t, node)) {
                t.next = node;
                return t;
            }
        }
    }
}
在队列的尾部插入新的 Node 节点,但是需要注意的是由于 AQS 中会存在多个线程同时争夺资源的情况,因此肯定会出现多个线程同时插入节点的操作,在这里是通过 CAS 自旋的方式保证了操作的线程安全性。
public final boolean release(int arg) {
    if (tryRelease(arg)) {
        Node h = head;
        if (h != null && h.waitStatus != 0)
            unparkSuccessor(h);
        return true;
    }
    return false;
}

private void unparkSuccessor(Node node) {
    // 如果状态是负数,尝试把它设置为0
    int ws = node.waitStatus;
    if (ws < 0)
        compareAndSetWaitStatus(node, ws, 0);
    // 得到头结点的后继结点head.next
    Node s = node.next;
    // 如果这个后继结点为空或者状态大于0
    // 通过前面的定义我们知道,大于0只有一种可能,就是这个结点已被取消(只有 Node.CANCELLED(=1) 这一种状态大于0)
    if (s == null || s.waitStatus > 0) {
        s = null;
        // 从尾部开始倒着寻找第一个还未取消的节点(真正的后继者)
        for (Node t = tail; t != null && t != node; t = t.prev)
            if (t.waitStatus <= 0)
                s = t;
    }
    // 如果后继结点不为空,
    if (s != null)
        LockSupport.unpark(s.thread);
}
如果tryRelease(arg)成功释放了锁,那么接下来会检查队列的头结点。如果头结点存在并且waitStatus不为0(这意味着有线程在等待),那么会调用unparkSuccessor(Node h)方法来唤醒等待的线程。
Thread.run() similar to Thread.start() What’s the difference?the two most significant methods of multithreading are start() and run().
However, if we call the run() function directly, no new thread is generated, and the run() method is executed as a normal method call on the current calling thread, with no multi-threading
start() method cannot be performed again without throwing anIllegalStateException
It is never legal to start a thread more than once
In particular, a thread may not be restarted once it has completed execution.
run() method can call many times since it’s just a regular method call

Java 内存模型(Java Memory Model,JMM)定义了 Java 程序中的变量、线程如何和主存以及工作内存进行交互的规则, 可以理解为并发编程相关的一组规范
JMM在Java中主要解决线程同步与通信问题, 涉及到内存可见性, 指令重排等问题
Java 是最早尝试提供内存模型的编程语言。由于早期内存模型存在一些缺陷(比如非常容易削弱编译器的优化能力),从 Java5 开始,Java 开始使用新的内存模型
一般来说,编程语言也可以直接复用操作系统层面的内存模型。不过,不同的操作系统内存模型不同。如果直接复用操作系统层面的内存模型,就可能会导致同样一套代码换了一个操作系统就无法执行了。 Java 语言是跨平台的,它需要自己提供一套内存模型以屏蔽系统差异。

红色区域称主内存, 是线程存放共享变量的区域
白色为本地内存
和 CPU cache 类似, 当多个线程同时读写共享变量时, 线程不存在同步机制会导致变量被覆写, 导致结果不可预见

如何解决内存可见性问题?
关于主内存与工作内存直接的具体交互协议,即一个变量如何从主内存拷贝到工作内存,如何从工作内存同步到主内存之间的实现细节,Java 内存模型定义来以下八种同步操作
 初次之外还规定了很多同步规则,这不重要
为了提升执行速度/性能,计算机在执行程序代码的时候,会对指令进行重排序。
什么是指令重排序? 简单来说就是系统在执行代码的时候并不一定是按照你写的代码的顺序依次执行。指令重排序可以保证串行语义一致,但是没有义务保证多线程间的语义也一致 ,所以在多线程下,指令重排序可能会导致一些问题。
happens-before 这个概念最早诞生于 Leslie Lamport 于 1978 年发表的论文《Time,Clocks and the Ordering of Events in a Distributed System》。在这篇论文中,Leslie Lamport 提出了逻辑时钟的概念,这也成了第一个逻辑时钟算法 。
逻辑时钟并不度量时间本身,仅区分事件发生的前后顺序,其本质就是定义了一种 happens-before 关系。
也就是说, happen-before确定了

结合happen-before关系和上述的同步规则, 就可以解决线程的通信与同步
int userNum = getUserNum();   // 1
int teacherNum = getTeacherNum();   // 2
int totalNum = userNum + teacherNum;  // 3
虽然 1 happens-before 2,但对 1 和 2 进行重排序不会影响代码的执行结果,所以 JMM 是允许编译器和处理器执行这种重排序的。但 1 和 2 必须是在 3 执行之前,也就是说 1,2 happens-before 3 。
happen-before 的实质就是前一个操作是否需要对后一个操作可见也就是涉及到了两个操作共有的变量, 需要便符合happen-before 关系 这与是否为并发环境无关

A concurrent application’s ability to execute in a timely manner is known as its liveness. This section describes the most common kind of liveness problem, [[deadlock]], and goes on to briefly describe two other liveness problems, starvation and livelock.
Deadlock describes a situation where two or more threads are blocked forever, waiting for each other.
Alphonse and Gaston are friends, and great believers in courtesy. A strict rule of courtesy is that when you bow to a friend, you must remain bowed until your friend has a chance to return the bow. Unfortunately, this rule does not account for the possibility that two friends might bow to each other at the same time. This example application followed models this possibility:
public class Deadlock {
    static class Friend {
        private final String name;
        public Friend(String name) {
            this.name = name;
        }
        public String getName() {
            return this.name;
        }
        public synchronized void bow(Friend bower) {
            System.out.format("%s: %s"
                + "  has bowed to me!%n",
                this.name, bower.getName());
            bower.bowBack(this);
        }
        public synchronized void bowBack(Friend bower) {
            System.out.format("%s: %s"
                + " has bowed back to me!%n",
                this.name, bower.getName());
        }
    }

    public static void main(String[] args) {
        final Friend alphonse =
            new Friend("Alphonse");
        final Friend gaston =
            new Friend("Gaston");
        new Thread(new Runnable() {
            public void run() { alphonse.bow(gaston); }
        }).start();
        new Thread(new Runnable() {
            public void run() { gaston.bow(alphonse); }
        }).start();
    }
}
when they attempt to invoke bowBack. Neither block will ever end, because each thread is waiting for the other to exit bow.
在 Java 中,关键字 synchronized 可以保证在同一个时刻,只有一个线程可以执行某个方法或者某个代码块(主要是对方法或者代码块中存在共享数据的操作) synchronized 的另外一个重要的作用,synchronized 可保证一个线程的变化(主要是共享数据的变化)被其他线程所看到
The Java programming language provides two basic synchronization idioms:
synchronized methods and synchronized statements.
we are talking about synchronization idioms
synchronization idiomsTo make a method synchronized, simply add the synchronized keyword to its declaration:
public class SynchronizedCounter {
    private int c = 0;

    public synchronized void increment() {
        c++;
    }

    public synchronized void decrement() {
        c--;
    }

    public synchronized int value() {
        return c;
    }
}
making these methods synchronized has two effects
Note: constructors cannot be synchronized, That’s doesn’t make sense, only thread creates an Object have access to it while it is being constructed
Note: When constructing an object that will be shared between threads, be very careful that a reference to the object does not “leak” prematurely.
if we maintain an List in one thread. which hold all instances, the constructor will look like
 //...new List
 instances.add(this);
If you do that, other thread can call the instances (this) before the construction finish. Which will cause problem.
all reads or writes to that object’s variables are done through synchronized methods with one exception final field, which can not modify after constructed, can be safely read through non-synchronized methods
we already know sunchronization is to avoid mem-consist problem , How does that work?
Synchronization is built around an internal entity known as the intrinsic lock or monitor lock (an entity simply as a “monitor.”) with two job
Every object has an intrinsic lock associated with it. when one thread need exclusive and consistent access to an Object, have to acquire lock and release when finish There is no chance to get the same lock when other thread own that. The other thread will block when it attempts to acquire the lock.
The lock release occurs even if the return was caused by an uncaught exception.
we also have static sync method, which is associated with a class, not an object.
public class MyClass {
    private static int staticField = 0;  // 静态字段
    private int instanceField = 0;       // 实例字段

    // 静态方法,访问静态字段
    public static synchronized void incrementStaticField() {
        staticField++;
    }

    // 实例方法,访问实例字段
    public synchronized void incrementInstanceField() {
        instanceField++;
    }
}
the thread acquires the intrinsic lock for the Class object associated with the class, which is different from any instance lock.
Another way to create synchronized code is with synchronized statements. Unlike synchronized methods, synchronized statements must specify the object that provides the intrinsic lock:
public void addName(String name) {
    synchronized(this) {
        lastName = name;
        nameCount++;
    }
    nameList.add(name);
}
In that case, addName has to sync change with lastName and nameCount, but also needs to avoid synchronizing invocations of other objects’ methods. (this may cause a deadlock, will talk later)
Without synchronized statements, there would have to be a separate, unsynchronized method for the sole purpose of invoking nameList.add.
Synchronized statements are also useful for improving concurrency with fine-grained synchronization.
for example, we have two field c1 and c2, they never used together and we should keep all field sync, there’s no reason to prevent an update of c1 from being interleaved with an update of c2, since they wont rely on others.
Instead of using synchronized methods or otherwise using the lock associated with this, we create two objects solely to provide locks.
public class MsLunch {
    private long c1 = 0;
    private long c2 = 0;
    private Object lock1 = new Object();
    private Object lock2 = new Object();

    public void inc1() {
        synchronized(lock1) {
            c1++;
        }
    }

    public void inc2() {
        synchronized(lock2) {
            c2++;
        }
    }
}
In that case, two variable can update interleaved.
these two objects considered “locks” not two instences
Recall that a thread cannot acquire a lock owned by another thread. But a thread can acquire a lock that it already owns.
Allowing a thread to acquire the same lock more than once enables reentrant synchronization. This describes a situation where synchronized code, directly or indirectly, invokes a method that also contains synchronized code, and both sets of code use the same lock.
Without reentrant synchronization, synchronized code would have to take many additional precautions to avoid having a thread cause itself to block. (dead lock we will talk later)
next atomic
synchronized 关键字最主要有以下 3 种应用方式:
同步方法,为当前对象加锁,进入同步代码前要获得当前对象的锁;
同步静态方法,为当前类加锁,进入同步代码前要获得当前类的锁;
public class AccountingSyncClass implements Runnable {
    static int i = 0;
    /**
     * 同步静态方法,锁是当前class对象,也就是
     * AccountingSyncClass类对应的class对象
     */
    public static synchronized void increase() {
        i++;
    }
    // 非静态,访问时锁不一样不会发生互斥
    public synchronized void increase4Obj() {
        i++;
    }
    @Override
    public void run() {
        for(int j=0;j<1000000;j++){
            increase();
        }
    }
    public static void main(String[] args) throws InterruptedException {
        //new新实例
        Thread t1=new Thread(new AccountingSyncClass());
        //new新实例
        Thread t2=new Thread(new AccountingSyncClass());
        //启动线程
        t1.start();t2.start();
        t1.join();t2.join();
        System.out.println(i);
    }
}
/**
 * 输出结果:
 * 2000000
 */
public class AccountingSync2 implements Runnable {
    static AccountingSync2 instance = new AccountingSync2(); // 饿汉单例模式

    static int i=0;

    @Override
    public void run() {
        //省略其他耗时操作....
        //使用同步代码块对变量i进行同步操作,锁对象为instance
        synchronized(instance){
            for(int j=0;j<1000000;j++){
                i++;
            }
        }
    }

    public static void main(String[] args) throws InterruptedException {
        Thread t1=new Thread(instance);
        Thread t2=new Thread(instance);
        t1.start();t2.start();
        t1.join();t2.join();
        System.out.println(i);
    }
}
这里的锁指的是 Java 内置的隐式锁 monitor 也是
synchronized封装好的实现 每个对象都有一个对象锁,不同的对象,他们的锁不会互相影响。
synchronized 与 happens before
[[JMM内存模型]]
In programming, an atomic action is one that effectively happens all at once.
it either happens completely, or it doesn’t happen at all.
some method you can consider as atomic
Reads and writes are atomic for reference variables and for most primitive variables (all types except long and double).
Reads and writes are atomic for all variables declared volatile
Atomic actions cannot be interleaved, so they can be used without fear of thread interference.
volatile idiomReads and writes are atomic for all variables declared volatile (include double and long)
In most 32-bit and 64-bit processors, a
longordoublevariable requires two separate 32-bit reads or writes to access the full 64-bit value.As a result, the operation of reading or writing a
longordoubleis not guaranteed to be atomic at the hardware level.
Using volatile can reduce the risk of mem-consist, because any write to volatile var will establishes a happen-before relationship with subsequent reads of that same variable
This means that changes to a volatile variable are always visible to other threads.
Using simple atomic variable access is more efficient than accessing these variables through synchronized code
one of Thread most 3 errors
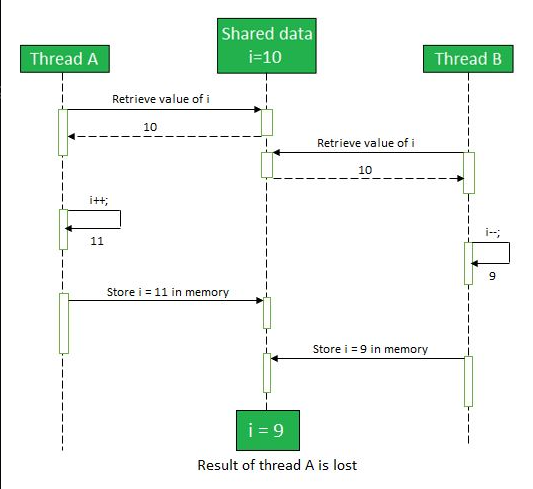
different threads have inconsistent views of what should be the same data
The causes of memory consistency errors are complex, Fortunately, we don’t have to need a detailed understanding of these causes.
we need a strategy for avoiding them.
The key to avoid MC errors is understanding Happen-before relationship
Happen-beforea relationship guarantee memory writes by one specific statement are visible to another specific statement
for our example, Change in Thread A will visible to Thread B
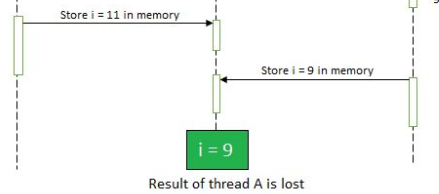
the value will lost, because there’s no guarantee that thread A’s change to
iwill be visible to thread B
To create a happen-before relation, we can use synchronization
We already see happen-before relationship
Thread.start()
when a statement invoke start(), every statement happen-before the statement also has same relation with new thread’s statement
means that the effects of creating new thread are visible
Thread.join
all the statements executed by the terminated thread have a happens-before relationship with all the statements following the successful join
the effect of terminated thread now visiable to the thread performed join
重入性指当线程需要再次获取同一把锁时, 不会因为自身而造成死锁, 锁的本质是作用于代码块或方法,而不是线程的整个执行上下文。即使线程已经持有锁,进入新的同步方法或代码块时,仍然需要执行获取锁的操作,确保锁的计数正确。
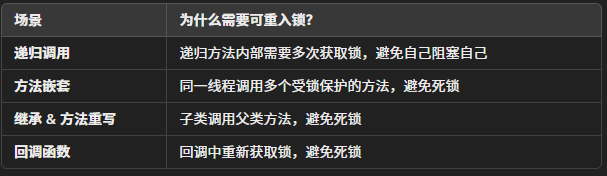
所以支持重入性应该解决下列问题
ReentrantLockJava语言直接提供了synchronized关键字用于加锁,但这种锁一是很重,二是获取时必须一直等待,没有额外的尝试机制。
if (lock.tryLock(1, TimeUnit.SECONDS)) {
    try {
        ...
    } finally {
        lock.unlock();
    }
}
java.util.concurrent.locks包提供的ReentrantLock用于替代synchronized加锁
尝试获取锁的时候,最多等待1秒。如果1秒后仍未获取到锁,tryLock()返回false,程序就可以做一些额外处理,而不是无限等待下去。
所以,使用ReentrantLock比直接使用synchronized更安全,线程在tryLock()失败的时候不会导致死锁。
public class Counter {
	//和关键字不同, 需要获得一个重入锁对象
    private final Lock lock = new ReentrantLock();
    private int count;

    public void add(int n) {
		//代码块加锁
        lock.lock();
        try {
            count += n;
        } finally {
	        //在finally中解锁
            lock.unlock();
        }
    }
}
进程使得操作系统可以并发的执行任务 但是在一段时间内单个进程只能执行一个任务 进程内的子任务只能逐个按顺序执行, 效率还有提升空间
因此提出线程概念, 使得一个线程可以执行一个子任务使得进程内部也可实现并发, 提高效率
多线程的优势
进程间的通信比较复杂,而线程间的通信比较简单,通常情况下,我们需要使用共享资源,这些资源在线程间的通信很容易。
进程是重量级的,而线程是轻量级的,多线程方式的系统开销更小。
Java中创建线程的三种方式
Thread 类重写 run 方法
public class MyThread extends Thread {
    @Override
    public void run() {
        for (int i = 0; i < 100; i++) {
            System.out.println(getName() + ":打了" + i + "个小兵");
        }
    }
}
主函数启动线程
//创建MyThread对象
MyThread t1=new MyThread();
MyThread t2=new MyThread();
MyThread t3=new MyThread();
//设置线程的名字
t1.setName("鲁班");
t2.setName("刘备");
t3.setName("亚瑟");
//启动线程
t1.start();
t2.start();
t3.start();
Runnable 接口创建任务类实现 Runnable 接口
public class MyRunnable implements Runnable {
    @Override
    public void run() {
        for (int i = 0; i < 10; i++) {
            try {//sleep会发生异常要显式处理
                Thread.sleep(20);//暂停20毫秒
            } catch (InterruptedException e) {
                e.printStackTrace();
            }
            System.out.println(Thread.currentThread().getName() + "打了:" + i + "个小兵");
        }
    }
}
主函数启动线程
//创建MyRunnable类
MyRunnable mr = new MyRunnable();
//创建Thread类的有参构造,并设置线程名
Thread t1 = new Thread(mr, "张飞");
Thread t2 = new Thread(mr, "貂蝉");
Thread t3 = new Thread(mr, "吕布");
//启动线程
t1.start();
t2.start();
t3.start();
Callable<> 接口相较于
Runnable接口callable<>可以获取线程的执行结果, 使用FutureTask类存储 了解 [[获取线程执行结果]]
重写 call<> 方法
public class CallerTask implements Callable<String> {
   public String call() throws Exception {
       return "Hello,i am running!";
   }
}
主函数启动线程
        //创建异步任务
        FutureTask<String> task=new FutureTask<String>(new CallerTask());
        //启动线程
        new Thread(task).start();
        try {
            //等待执行完成,并获取返回结果
            String result=task.get();
            System.out.println(result);
        } catch (InterruptedException e) {
            e.printStackTrace();
        } catch (ExecutionException e) {
            e.printStackTrace();
        }
    }
进程 说简单点就是我们在电脑上启动的一个个应用。它是操作系统分配资源的最小单位。
线程 是进程的子任务,是 CPU 调度和分派的基本单位,实现了进程内部的并发。
线程,是进程的子任务,是进程中的独立执行单元。多个线程可以共享同一个进程的资源,如内存;每个线程都有自己独立的栈和寄存器。

并发环境下, 多线程存在下述问题
Inter-thread communication in Java is a mechanism in which a thread is paused running in its critical section and another thread is allowed to enter (or lock) in the same critical section to be executed.
线程间通信 是一种机制,使得线程能够在执行时进行协作,通常用于解决某些线程需要等待其他线程完成任务的情况。它主要涉及线程之间的等待和通知机制,而不是同一临界区内的互斥访问。
Synchronization is crucial for ensuring that multiple threads operate safely on shared resources. Without *Synchronization, data inconsistency or corruption can occur when multiple threads try to access and modify shared variables simultaneously. In Java, it is a mechanism that ensures that only one thread can access a resource at any given time
线程同步的重点是 保证线程安全,特别是在多个线程访问共享资源时。同步机制通过确保某个共享资源在同一时刻只能被一个线程访问来防止数据不一致或冲突。Java 中的
synchronized关键字和ReentrantLock都是同步机制的实现,确保线程在访问共享资源时不会发生并发冲突。
解决上述问题的方式有两种

Java 使用共享内存的并发模型实现线程同步与通信, 这个模型称之为 JMM JMM 决定了一个线程对共享变量的写入何时对另外一个线程可见。
引用: Geekfork
Java的线程分为两类, 用户线程和守护线程
线程调度就是线程不同状态间的转换
在操作系统中,线程被视为轻量级的进程,所以线程状态其实和进程状态是一致的。

Java线程有如下状态
// Thread.State 源码
public enum State {
    NEW,
    RUNNABLE,
    BLOCKED,
    WAITING,
    TIMED_WAITING,
    TERMINATED;
}
处于 NEW 状态的线程是刚创建 Thread 而尚未启动。这里的尚未启动指的是还没调用 Thread 实例的start()方法。
private void testStateNew() {
    Thread thread = new Thread(() -> {});
    System.out.println(thread.getState()); // 输出 NEW
}
线程启动之后的状态
call thread.start() will Causes this thread to begin execution; the Java Virtual Machine calls the run method of this thread.
The result is that two threads are running concurrently: the current thread (which returns from the call to the start method) and the other thread (which executes its run method).
当前线程正在运行中。处于 RUNNABLE 状态的线程在 Java 虚拟机中运行
It is never legal to start a thread more than once. In particular, a thread may not be restarted once it has completed execution.
when recall a RUNNABLE thread, an IllegalThreadStateException will throwed if the thread was already started.
Java 线程的RUNNABLE状态其实包括了操作系统线程的ready和running两个状态。
阻塞状态。处于 BLOCKED 状态的线程正等待锁(锁会在后面细讲)的释放以进入同步区。
等待状态。处于等待状态的线程变成 RUNNABLE 状态需要其他线程唤醒。
Object.wait():使当前线程处于等待状态直到另一个线程唤醒它Thread.join():等待线程执行完毕,底层调用的是 Object 的 wait 方法,等待期间可以通过Object.notify()/notifyAll()/Locksupport.unpark()唤醒LockSupport.park():除非获得调用许可,否则禁用当前线程进行线程调度超时等待状态。线程等待一个具体的时间,时间到后会被自动唤醒。
调用如下方法会使线程进入超时等待状态:
Thread.sleep(long millis):使当前线程睡眠指定时间
Object.wait(long timeout):线程休眠指定时间,等待期间可以通过Object.notify()/notifyAll()/Locksupport.unpark()唤醒
Thread.join(long millis):等待当前线程最多执行 millis 毫秒,如果 millis 为 0,则会一直执行
LockSupport.parkNanos(long nanos): 除非获得调用许可,否则禁用当前线程进行线程调度指定时间
LockSupport.parkUntil(long deadline):同上,也是禁止线程进行调度指定时间;
终止状态


Object.wait()
调用wait()方法前线程必须持有对象的锁。线程调用wait()方法时,会释放当前的锁,直到有其他线程调用notify()/notifyAll()方法唤醒等待锁的线程。
需要注意的是,其他线程调用notify()方法只会唤醒单个等待锁的线程,如有有多个线程都在等待这个锁的话不一定会唤醒到之前调用wait()方法的线程。
同样,调用notifyAll()方法唤醒所有等待锁的线程之后,也不一定会马上把时间片分给刚才放弃锁的那个线程,具体要看系统的调度。
Object.wait(long)/Object.wait(long, int)wait(long)方法使线程进入 TIMED_WAITING 状态。这里的wait(long)方法与无参方法 wait()相同的地方是,都可以通过其他线程调用notify()或notifyAll()方法来唤醒。
不同的地方是,有参方法wait(long)就算其他线程不来唤醒它,经过指定时间 long 之后它会自动唤醒,拥有去争夺锁的资格。
Thread.join()调用join()方法,会一直等待这个线程执行完毕(转换为 TERMINATED 状态)。
Thread.sleep(long)使当前线程睡眠指定时间。需要注意这里的“睡眠”只是暂时使线程停止执行,并不会释放锁。时间到后,线程会重新进入 RUNNABLE 状态。
yield():Thread 类中的静态方法,当一个线程调用 yield 方法时,实际是在暗示线程调度器,当前线程请求让出自己的 CPU,但是线程调度器可能会“装看不见”忽略这个暗示。
中断(Interrupt)一个线程意味着在该线程完成任务之前停止其正在进行的一切,有效地中止其当前的操作。线程是死亡、还是等待新的任务或是继续运行至下一步,就取决于这个程序。
那么,我们究竟应该如何停止线程呢?
冻结状态,无法读取标记,此时可以使用interrupt()方法将线程从冻结状态强制恢复到运行状态中来,让线程具备CPU的执行资格。Thread.interrupt(long)
作用是中断阻塞的线程。将会设置线程中断为true,中断的结果线程是死亡、还是等待新的任务或是继续运行至下一步,就取决于这个程序本身。 线程会不时地检测这个中断标示位,以判断线程是否应该被中断(中断标示值是否为true)。 该方法只是改变中断状态,不会中断一个正在运行的线程。
因为该方法并不执行中断, 只是指示线程中断因此用户需要监视线程的执行结果来判断下一步操作 比如抛出interruptedException的方法, 监视线程的中断状态,一旦线程的中断状态被置为“中断状态”,就会抛出中断异常, 从而指示阻塞线程退出阻塞
引用: 博客园
前置 线程池
是 Java 中提供的一种用于实现线程局部变量的工具类。它允许每个线程都拥有自己的独立副本,从而实现线程隔离,用于解决多线程中共享对象的线程安全问题。

使用:
创建 ThreadLocal对象
//创建一个ThreadLocal变量
public static ThreadLocal<String> localVariable = new ThreadLocal<>();
设置值
//设置ThreadLocal变量的值 localVariable.set("0001");
获取值
//获取ThreadLocal变量的值 String value = localVariable.get();
优点
线程隔离 实现了变量的独占, 使变量不需要同步处理
数据传递方便 ThreadLocal 常用于在跨方法、跨类时传递上下文数据(如用户信息等),而不需要在方法间传递参数。
ThreadLocalMapThreadLocalMap, 一个key-value数据形式结构,也是ThreadLocal的核心。
Map内部维护了一个Entry数组, 真正的数据存储在 Entry中, map的key是每个线程中ThreadLocal对象的哈希, value是隔离变量
/**
	 * 初始容量
	 */
	private static final int INITIAL_CAPACITY = 16;

	/**
	 * ThreadLocalMap数据真正存储在table中
	 */
	private Entry[] table;

	/**
	 * ThreadLocalMap条数
	 */
	private int size = 0;

	/**
	 * 达到这个大小,则扩容
	 */
	private int threshold; // 默认为0

为了保证Entry[] 数组散步均匀, 哈希算法如下
把对应的 key 映射到 table 数组的相应下标,ThreadLocalMap 用的是哈希取余法,取出 key 的 threadLocalHashCode,然后和 table 数组长度减一&运算(相当于取余)。
int i = key.threadLocalHashCode & (table.length - 1);
这里的hashcode由魔术数生成
每创建一个 ThreadLocal 对象,它就会新增0x61c88647,这个值很特殊,它是斐波那契数 也叫 黄金分割数。hash增量为 这个数字,带来的好处就是 hash 分布非常均匀。
InheritableThreadLocal()父子线程是无法传输数据的, 但是通过InheritableThreadLocal实例就可以在子线程拿到值
public class InheritableThreadLocalTest {

    public static void main(String[] args) {
        final ThreadLocal threadLocal = new InheritableThreadLocal();
        // 主线程
        threadLocal.set("父线程");
        //子线程
        Thread t = new Thread() {
            @Override
            public void run() {
                super.run();
                System.out.println("子线程 ," + threadLocal.get());
            }
        };
        t.start();
    }
}
原理:
在Thread中有一个变量
ThreadLocal.ThreadLocalMap inheritableThreadLocals = null;

if (inheritThreadLocals && parent.inheritableThreadLocals != null)
    this.inheritableThreadLocals =
        ThreadLocal.createInheritedMap(parent.inheritableThreadLocals);
在 Thread.init 的时候,如果父线程的inheritableThreadLocals不为空,就把它赋给当前线程(子线程)的inheritableThreadLocals 。
volatilevolatile[[线程安全问题]]
线程池(ThreadPool) 是一种基于池化思想管理线程的工具
线程池解决的问题是, 在任意时刻下, 确定系统应该投入多少资源, 解决多少任务
不将线程统一管理可能会出现以下问题
为解决资源分配这个问题,线程池采用了“池化”(Pooling)思想。池化,顾名思义,是为了最大化收益并最小化风险,而将资源统一在一起管理的一种思想。

线程池内部维护了许多线程, 当有新任务时就会分配一个空闲线程执行 当所有线程都有任务时, 新的任务要么放到阻塞队列里面要么增加线程
用法:
// 创建固定大小的线程池:
ExecutorService executor = Executors.newFixedThreadPool(3);
// 提交任务:
executor.submit(task1);
executor.submit(task2);
executor.submit(task3);
executor.submit(task4);
executor.submit(task5);
上述代码创建了大小为3的线程池, 并提交了5个任务
ExecutorService该接口要求实现工厂方法, 返回如下类型的线程池
Java的线程池核心实现为 ThreadPoolExecutor

顶级接口 Excutor 提供了一种思想, 将任务提交与任务执行解耦
用户只需提供 Runnable 对像, 将任务提交到执行器中, 剩余的线程调配和任务执行由执行器完成
ExecutorService接口增加了一些能力: (1)扩充执行任务的能力,补充可以为一个或一批异步任务生成Future的方法;(2)提供了管控线程池的方法,比如停止线程池的运行。
线程池构造类 ThreadPoolExecutor
通过传入参数实现线程池的构造
如下是成员变量,
![[content/en/java/Basic/Concurrent/Pasted image 20250203123133.png]]
参数解释
corePoolSize:线程池中用来工作的核心线程数量。maximumPoolSize:最大线程数,线程池允许创建的最大线程数, 可以理解为非核心线程 + 核心线程数workQueue:任务队列,是一个阻塞队列,当线程数达到核心线程数后,会将任务存储在阻塞队列中。threadFactory :线程池内部创建线程所用的工厂。handler:拒绝策略;当队列已满并且线程数量达到最大线程数量时,会调用该方法处理任务线程池使用前记得初始化
线程池的默认策略是构造完成后不创建线程, 也就是说刚创建好的线程池是没有线程的, 只有传入的 BlockingQueue 也就是[[阻塞队列]] 和其他参数
![[content/en/java/Basic/Concurrent/Pasted image 20250203123400.png]]
使用线程池之后
当调用任务执行方法 execute() 时启动执行流程
线程执行任务流程如下
队列未满, 创建核心线程
![[content/en/java/Basic/Concurrent/Pasted image 20250203123742.png]] 队列已满, 创建非核心线程![[content/en/java/Basic/Concurrent/Pasted image 20250203124516.png]]
所以,就算队列中已经塞满了任务,新创建的线程还是会优先处理提交的任务,而不是从队列中获取已有的任务执行,从这可以看出,先提交的任务不一定先执行。
当上述流程无法完成时, 会使用拒绝策略抛出异常
JDK 自带的 RejectedExecutionHandler 实现有 4 种
任务执行方法 excute()
源码如下
public void execute(Runnable command) {
    // 首先检查提交的任务是否为null,是的话则抛出NullPointerException。
    if (command == null)
        throw new NullPointerException();

    // 获取线程池的当前状态(ctl是一个AtomicInteger,其中包含了线程池状态和工作线程数)
    int c = ctl.get();

    // 1. 检查当前运行的工作线程数是否少于核心线程数(corePoolSize)
    if (workerCountOf(c) < corePoolSize) {
        // 如果少于核心线程数,尝试添加一个新的工作线程来执行提交的任务
        // addWorker方法会检查线程池状态和工作线程数,并决定是否真的添加新线程
        if (addWorker(command, true))
            return;
        // 重新获取线程池的状态,因为在尝试添加线程的过程中线程池的状态可能已经发生变化
        c = ctl.get();
    }

    // 2. 尝试将任务添加到任务队列中
    if (isRunning(c) && workQueue.offer(command)) {
        int recheck = ctl.get();
        // 双重检查线程池的状态
        if (! isRunning(recheck) && remove(command))  // 如果线程池已经停止,从队列中移除任务
            reject(command);
        // 如果线程池正在运行,但是工作线程数为0,尝试添加一个新的工作线程
        else if (workerCountOf(recheck) == 0)
            addWorker(null, false);
    }
    // 3. 如果任务队列满了,尝试添加一个新的非核心工作线程来执行任务
    else if (!addWorker(command, false))
        // 如果无法添加新的工作线程(可能因为线程池已经停止或者达到最大线程数限制),则拒绝任务
        reject(command);
}
Craig, Landin, and Hagersten locks(下称 CLH 锁)的变体。在并发编程中,锁是一种常用的保证线程安全的方法。
Java 中常用的锁主要有两类,一种是关键字 _index ,被称为 Java 内置锁或监视器锁。
另一种就是在 J2SE 1.5版本之后的 java.util.concurrent包(下称j.u.c包)中的各类同步器
包括 ReentrantLock(可重入锁),ReentrantReadWriteLock(可重入读写锁),Semaphore(信号量),CountDownLatch 等
这些同步器都是基于 AbstractQueuedSynchronizer(下称 AQS)这个简单的框架来构建的
AQS 类的核心数据结构是一种名为 Craig, Landin, and Hagersten locks(下称 CLH 锁)的变体。
CLH锁是自旋锁的一种改良
自旋锁是互斥锁的一种实现, 用于保证线程间正确互斥
获取锁时,线程会对一个原子变量循环执行 compareAndSet 方法,直到该方法返回成功时即为成功获取锁
compareAndSet方法底层由[[atomic]]实现
![[content/en/java/Basic/Concurrent/Pasted image 20250203201648.png]]
自旋锁减少了线程上下文开销, 减缓了频繁的线程挂起操作
但是该锁有很严重的缺点
这是对自旋锁的改进版本 主要针对上述两个缺点做了改进
![[content/en/java/Basic/Concurrent/Pasted image 20250203203420.png]]
CLH 锁初始化时会 Tail 会指向一个状态为 false 的空节点,如图1所示。
当 Thread 1(下称 T1)请求获取锁时,Tail 节点指向 T1 对应的节点,同时返回空节点。T1 检查到上一个节点状态为 false,就成功获取到锁,可以执行相应的逻辑了,如图2所示。
当 Thread 2(下称 T2)请求获取锁时,Tail 节点指向 T2 对应的节点,同时返回 T1 对应的节点。T2检查到上一个节点状态为 True,无法获取到锁,于是开始轮询上一个节点的状态,如图3所示。
当 T1 释放锁时,会将状态变量置为 False,如图4所示。
T2 轮询到检查到上一个节点状态变为 False,则获取锁成功,如图5所示。
Java 源码
![[content/en/java/Basic/Concurrent/Pasted image 20250203203732.png]]
了解 ThreadLocal
利用 ThreadLocal 在独立线程内存维护node, node中只存储了该线程锁状态
为什么锁要加 volatile
注意, 虽然锁状态只由宿主线程读取写入, 是单线程操作没必要保证可见性, 但是作为互斥锁需要保证 happen-before 规则成立, 这就意味着一个监视器锁的解锁发生在该监视器锁的后续锁定之前, 因此为了防止无法预测的重排序导致锁的状态在读取完成前被修改, 使用[[volatile关键字]]禁止重排序
为什么作为链表, node中不存储后继指针 很简单, 因为不需要, 作为先来先服务的队列, 没必要在乎后续节点的状态 只要前一个节点释放锁, 就立刻获取即可
CLH 锁作为自旋锁的改进,有以下几个优点:
性能优异,获取和释放锁开销小。释放锁的开销因为不需要使用 CAS 指令而降低了。
公平锁。先入队的线程会先得到锁。
实现简单,易于理解。
当然,它也有两个缺点:第一是因为有自旋操作,当锁持有时间长时会带来较大的 CPU 开销。第二是基本的 CLH 锁功能单一,不改造不能支持复杂的功能。
[!引用] Quner技术沙龙 https://mp.weixin.qq.com/s/jEx-4XhNGOFdCo4Nou5tqg
Java 1.5 提供了 Callable、Future、FutureTask,它们可以在任务执行完后得到执行结果, 可以实现业务之间的并发执行与返回
在[[procthread]] 我们讲述了创建线程实现任务并发的 3 种方式,
直接继承 Thread
实现 Runnable 接口
实现 Callable<> 接口
前 2 种方式都有一个缺陷:在执行完任务之后无法获取执行结果。这对需要前置任务返回值的线程来说很重要
Java 1.5 提供了 Callable、Future、FutureTask,它们可以在任务执行完后得到执行结果
callable 源码如下
public interface Callable<V> {
    V call() throws Exception;
}
可以看到 call() 方法返回值为泛型 V
而
Callable<>允许返回值的一个任务
Runnable接口代表一个可以由线程执行的任务, 实现Runnable而不是callable主要是线程池的兼容性考虑
Future 异步计算结果接口Future 表示异步计算的结果,提供了用于检查计算是否完成、等待计算完成、以及检索计算结果的方法。
Future接口的设计目标是允许任务在一个线程中执行,并且可以返回执行结果或抛出异常
public interface Future<V> {
    boolean cancel(boolean mayInterruptIfRunning);
    boolean isCancelled();
    boolean isDone();
    V get() throws InterruptedException, ExecutionException;
    V get(long timeout, TimeUnit unit)
        throws InterruptedException, ExecutionException, TimeoutException;
}
get():等待任务完成,获取执行结果,如果任务取消会抛出异常get(long timeout, TimeUnit unit):指定等待任务完成的时间,等待超时会抛出异常注意,
get()方法会阻塞主进程, 一直阻塞到定时结束或者线程返回
Future也属于同步器的一种 因为类内部定义了线程的控制方法, 同步线程之间的状态Future的同步机制主要体现在它的get()方法:
- 如果任务已完成,
get()立即返回结果。- 如果任务尚未完成,
get()会将调用线程挂起,直到任务完成并且结果可用,才会唤醒线程并返回结果。
isDone():判断任务是否完成
isCancelled():判断任务是否被取消
cancel(boolean mayInterruptIfRunning):尝试取消此任务的执行,如果任务已经完成、已经取消或由于其他原因无法取消,则此尝试将失败
参数 mayInterruptIfRunning 表示是否允许取消正在执行却没有执行完毕的任务
FutureTask 异步计算接口实现类FutureTask<T> 是 Future 的一个实现类,同时也是 Runnable,可以直接用线程启动。
public class FutureTask<V> implements RunnableFuture<V>
public interface RunnableFuture<V> extends Runnable, Future<V> {
    void run();
}
FutureTask本身是对异步任务的封装,是Future的实现类, 实际的线程控制和结果计算是由其完成的
FutureTask通过run()方法实现了Callable的任务执行逻辑,因此兼容了Callable的行为, 但其本身是Runnable的任务
使用例子
import java.util.concurrent.*;

public class FutureExample {
    public static void main(String[] args) throws Exception {
        // 创建一个固定大小为3的线程池
        ExecutorService executorService = Executors.newFixedThreadPool(3);

        // 创建一个 Callable 数组,用于存储 5 个任务
        Callable<Integer>[] tasks = new Callable[5];
        for (int i = 0; i < tasks.length; i++) {
            final int index = i;
            tasks[i] = () -> {
                // 模拟任务执行时间,每个任务休眠 index+1 秒
                TimeUnit.SECONDS.sleep(index + 1);
                // 任务返回 (index + 1) * 100
                return (index + 1) * 100;
            };
        }

        // 使用 Future 数组存储任务的执行结果
        Future<Integer>[] futures = new Future[tasks.length];
        for (int i = 0; i < tasks.length; i++) {
            // 提交 Callable 任务到线程池,并返回 Future 对象
            futures[i] = executorService.submit(tasks[i]);
        }

        // 获取任务的执行结果
        for (int i = 0; i < futures.length; i++) {
            // 调用 get() 方法,会阻塞直到任务完成
            System.out.println("Result of task " + (i + 1) + ": " + futures[i].get());
        }

        // 关闭线程池,释放资源
        executorService.shutdown();
    }
}
上述代码定义了一系列 callable 任务, 包装为FutureTask便于线程池使用, 调用 执行器 创建了线程池服务并要求线程池服务执行提交的 FutureTask
Future<Integer>[] futures = new Future[tasks.length]这里是泛型 实际绑定的是FutureTask
CompleteableFuture 任务编排实现类A
Futurethat may be explicitly completed (setting its value and status), and may be used as aCompletionStage, supporting dependent functions and actions that trigger upon its completion.
Future在实际使用过程中存在一些局限性比如不支持异步任务的编排组合以及 使用Future获得异步执行结果时,要么调用阻塞方法get(),要么轮询看isDone()是否为true,这两种方法都不是很好,因为主线程也会被迫等待。
从Java 8开始引入了
CompletableFuture,它针对Future做了改进,可以传入回调对象,当异步任务完成或者发生异常时,自动调用回调对象的回调方法。
创建一个CompletableFuture是通过CompletableFuture.supplyAsync()实现的,它需要一个实现了Supplier接口的对象:
public interface Supplier<T> {
    T get();
}
紧接着,CompletableFuture已经被提交给默认的线程池执行了,我们需要定义的是CompletableFuture完成时和异常时需要回调的实例。完成时,CompletableFuture会调用Consumer对象:
public interface Consumer<T> {
    void accept(T t);
}
异常时,CompletableFuture会调用Function对象:
public interface Function<T, R> {
    R apply(T t);
}
示例:
/**
 * @program: alog
 * @description: 实现类
 * @author: hamhuo
 **/public class Future {
    public static void main(String[] args) throws InterruptedException {
        //创建异步执行的耗时任务, 获取一段文字
        CompletableFuture<String> task = CompletableFuture.supplyAsync(new fetchString());
        //这时已经开始执行了
        //如果执行成功执行回调
        task.thenAccept((response) -> {
            System.out.println(response + " human");
        });

        //如果失败执行回调
        task.exceptionally((e) -> {
            e.printStackTrace();
            return null;
        });

        //保证线程池正确关闭, 让主线程在任务完成后等一会
        task.join();
    }


    static class fetchString implements Supplier<String> {
        @Override
        public  String get() {
            String message = "hello from star";
            try{
                Thread.sleep(2000);
                message = "re:: correct";
            } catch (InterruptedException e) {
                Thread.currentThread().interrupt();
            }
            if (message.equals("hello from star")) {
                throw new RuntimeException("Earth");
            }
            return message;
        }
    }
}
thenAcccept() 不会阻塞线程, 是非阻塞的回调方法, 需要主线程手动等待完成
引用: https://liaoxuefeng.com/books/java/threading/completable-future/index.html https://javaguide.cn/java/concurrent/completablefuture-intro.html#future-%E4%BB%8B%E7%BB%8D
JDK 中提供了一些并发编程中常用的通信工具类以供我们开发者使用
| 类 | 作用 |
|---|---|
| Semaphore | 限制线程的数量 |
| Exchanger | 两个线程交换数据 |
| CountDownLatch | 线程等待直到计数器减为 0 时开始工作 |
| CyclicBarrier | 作用跟 CountDownLatch 类似,但是可以重复使用 |
| Phaser | 增强的 CyclicBarrier |
CountDownLatch一个减法计数器, 基于信号量
class CountTest{
	  public static void main(String[] args) throws InterruptedException {
		//设置一个尺寸为10的信号量
		 //总数是10,必须要执行任务的时候,再使用
        CountDownLatch countDownLatch = new CountDownLatch(10);

        for(int i=0; i<10; i++) {
            new Thread(()->{
                System.out.println(Thread.currentThread().getName()+" Go out");
                countDownLatch.countDown(); //数量减1
            },String.valueOf(i)).start();
        }

        countDownLatch.await(); //等待计数器归零,再向下执行

        System.out.println("Hello world!");
    }

}
两个方法
countDown() 调用后计数减一await() 使线程挂起ExchangerA synchronization point at which threads can pair and swap elements within pairs. Each thread presents some object on entry to the
exchangemethod, matches with a partner thread, and receives its partner’s object on return. An Exchanger may be viewed as a bidirectional form of aSynchronousQueue. Exchangers may be useful in applications such as genetic algorithms and pipeline designs.
class FillAndEmpty {
    Exchanger<DataBuffer> exchanger = new Exchanger<DataBuffer>();
    DataBuffer initialEmptyBuffer = ...
    DataBuffer initialFullBuffer = ...

    class FillingLoop implements Runnable {
        public void run() {
	        //初始化缓存
            DataBuffer currentBuffer = initialEmptyBuffer;
            try {
                while (currentBuffer != null) {
                    addToBuffer(currentBuffer);
                    if (currentBuffer.isFull())
	                    //如果缓存满, 需要交换, 在这里等
                        currentBuffer = exchanger.exchange(currentBuffer);
                }
            } catch (InterruptedException ex) { ... handle ... }
        }
    }

    class EmptyingLoop implements Runnable {
        public void run() {
            DataBuffer currentBuffer = initialFullBuffer;
            try {
                while (currentBuffer != null) {
                    takeFromBuffer(currentBuffer);
                    if (currentBuffer.isEmpty())
	                    //如果缓存空, 需要交换, 在这里等
                        currentBuffer = exchanger.exchange(currentBuffer);
                }
            } catch (InterruptedException ex) { ... handle ...}
        }
    }

    void start() {
        new Thread(new FillingLoop()).start();
        new Thread(new EmptyingLoop()).start();
    }
}
当一个线程调用 exchange 方法后,会处于阻塞状态,只有当另一个线程也调用了 exchange 方法,它才会继续执行。
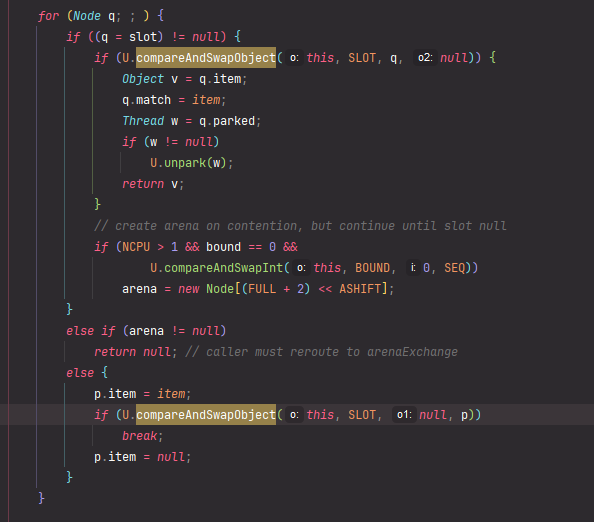
内部使用 CAS 检查, 使用park/unpark 做状态转换